Choosing the right window tint level is essential for achieving the perfect balance between privacy, comfort, and aesthetics. Window tint levels, measured by the percentage of visible light transmission (VLT), determine how much light passes through your windows. From the darkest 5% tint to the lightest 70%, each level serves a unique purpose and offers specific benefits. This comprehensive guide will help you understand the differences between tint levels, their advantages, and how to choose the best one for your needs.
What Are Window Tint Levels?
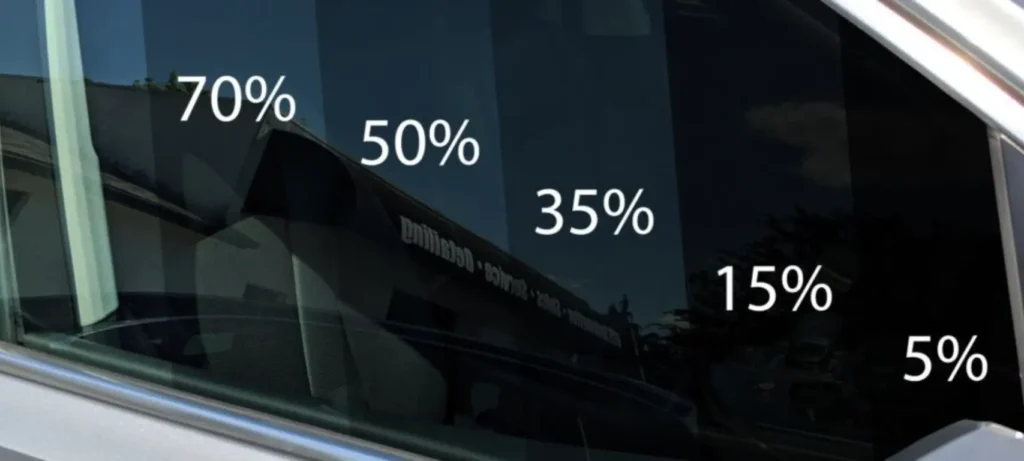
Window tint levels refer to the amount of visible light allowed to pass through the film and into your vehicle or home. The percentage represents the VLT, with lower percentages indicating darker tints:
- 5% Tint: Allows only 5% of light to pass through, offering maximum privacy and a bold look.
- 20% Tint: A popular choice for rear windows, balancing privacy and visibility.
- 35% Tint: Provides a moderate level of darkness while maintaining good visibility.
- 50% Tint: A lighter option that reduces glare and heat without significantly darkening the windows.
- 70% Tint: The lightest option, offering subtle UV protection and glare reduction.
Benefits of Different Tint Levels
1. 5% Tint: Maximum Privacy and Security
- Best For: Rear windows, SUVs, limousines, and vehicles used for transporting passengers.
- Advantages:
- Blocks almost all visible light, offering the highest level of privacy.
- Provides significant glare reduction, ideal for sunny climates.
- Enhances security by obscuring valuables inside the vehicle or home.
- Considerations:
- Not legal for front windows in many states, including California.
- Reduced visibility at night can be a safety concern.
2. 20% Tint: Balanced Privacy and Style
- Best For: Rear windows of cars, trucks, and homes where moderate privacy is desired.
- Advantages:
- Offers strong privacy without being as dark as 5% tint.
- Effectively blocks UV rays and reduces heat inside the vehicle or home.
- Adds a sleek, stylish look to your windows.
- Considerations:
- May still be too dark for front windows in some states.
- Nighttime visibility is slightly reduced but manageable.
3. 35% Tint: Versatile and Stylish
- Best For: Drivers and homeowners seeking a balance between privacy, visibility, and aesthetics.
- Advantages:
- Blocks a significant amount of heat and UV rays while maintaining good visibility.
- Provides a modern, subtle appearance.
- Legal for many front windows, depending on local regulations.
- Considerations:
- May not provide enough privacy for rear windows in high-traffic areas.
4. 50% Tint: Subtle and Functional
- Best For: Residential windows or vehicles where maximum visibility is a priority.
- Advantages:
- Reduces glare and protects against UV rays without noticeably darkening windows.
- Ideal for individuals who want light protection without compromising visibility.
- Can help reduce energy costs in homes and offices.
- Considerations:
- Offers minimal privacy compared to darker tints.
5. 70% Tint: Light and Barely Noticeable
- Best For: Windshields, front windows, and homes needing slight UV protection.
- Advantages:
- Provides a clear, natural view while blocking harmful UV rays.
- Compliant with most state laws for front windows and windshields.
- Excellent for those prioritizing visibility over privacy.
- Considerations:
- Does not offer significant privacy or heat rejection compared to darker tints.
How to Choose the Right Tint Level
1. Consider Your Needs
- Privacy: If privacy is a top priority, opt for 5% or 20% tints for rear windows.
- Heat Reduction: Darker tints like 20% or 35% are more effective at blocking heat.
- Visibility: Choose lighter tints like 50% or 70% to ensure clear visibility, especially at night.
2. Check Local Tint Laws
Every state has specific regulations regarding permissible tint levels for front, side, and rear windows. For example:
- In California, front side windows must have a VLT of 70% or higher.
- Rear and back side windows have more flexibility but may still have restrictions.
- Consult California’s tinting laws for legal requirements.
3. Factor in Aesthetics
Darker tints, like 20%, offer a bold and sleek appearance, while lighter tints, like 50%, provide a more subtle look.
4. Think About Maintenance
Darker tints can show scratches and dirt more easily. Choose high-quality films for easier upkeep.
Professional vs. DIY Window Tinting
Professional Installation
- Advantages:
- Precise application without bubbles or creases.
- Access to premium-grade films with warranties.
- Compliance with local laws.
- Disadvantages:
- Higher upfront cost, ranging from $150 to $600 depending on tint level and vehicle size.
DIY Tinting
- Advantages:
- Lower cost, with kits starting at $20.
- Flexible installation schedule.
- Disadvantages:
- Risk of improper application, leading to peeling or bubbling.
- No warranties or guarantees.
Maintaining Your Window Tints
- Clean Gently: Use ammonia-free cleaners and soft microfiber cloths.
- Avoid Harsh Conditions: Prolonged exposure to extreme heat or cold can shorten the lifespan of tints.
- Inspect Periodically: Check for bubbles, peeling, or fading and address issues promptly.
Conclusion
Understanding window tint levels is crucial for choosing the right option for your car or home. From the darkest 5% to the lightest 70%, each level offers unique benefits tailored to privacy, comfort, and style. For expert guidance and professional window tinting service, trusted providers like Cali Auto Glass & Tint in San Diego ensure your tints are functional, stylish, and compliant with local laws. Invest in high-quality tints today to enhance your comfort and protect your space.